There's a 12v supply available from the alternator and car battery. It must power a PIC microcontroller which flashes a small array (2-6) LEDs at an arbitrary rate (or rates) at some fixed voltage in the PIC's range (one which maximizes the array's brightness). Current draw isn't a big deal, as long as it's similar to current draw of other bulbs in the car, and as long as it's not overheating within the confines of the dome-light shell. Input buttons to change the LED array duty-cycle are optional.
The 12v supply is toggled outside this circuit (either by the dome-light switch, or by the ignition)
Optimize for: small size, low cost, and high brightness that's well directed
LEDs should be either amber or green to preserve dark-adaptation.
LEDs should be of the new super-bright flashlight replacement variety. Further product-searching is under this dropdown:
Digikey (all red)
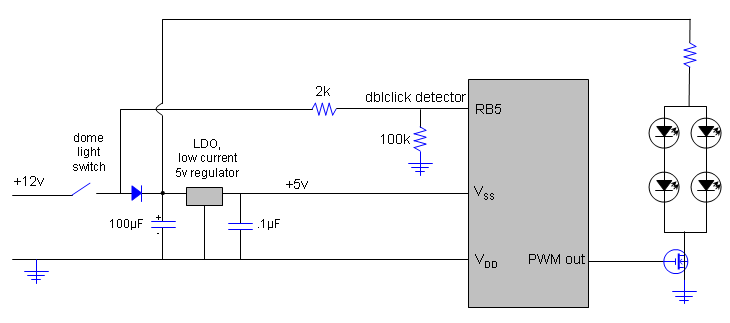
Voltage "Regulator": The 12v goes through an emitter-follower voltage divider to produce fixed 5 volts. This is a cheap but inefficient PSU, so the resistors should be as high a value as possible to minimize current draw, but be slightly higher than the PIC's current usage (2mA). The LED will driven directly from the 12v so we don't have to drive that here. The transistor (as explained in the link) is used to keep the divided voltage relatively constant regardless of load (eg. current draw will go up quite a bit when an LED is strobed, and current draw is constantly changing due to the PIC's digital switching).
Okay, this is really just silly. For the cost of a TO-92 package transistor and 3 resistors, I can get one low-power low-dropout 5v linear regulator in a TO-92 package that does the same thing (okay, actually quite a bit more) and presumably gives off very little heat. Plus it'll take a lot less space and require less soldering. So just buy a bunch of those and keep them in the cabinet.
The fixed low voltage is buffered and stored in a large (~22µF electrolytic) capacitor as well as a small fast (~0.1µF ceramic?) capacitor to handle sudden changes in current. It's not a big deal if the LED's don't turn off instantaneously when power is removed, but they shouldn't stay on for more than a second or two.
Control: Power goes directly to the 16F628, which runs on its internal 4mhz oscillator to minimize parts/cost/size. Pins 4 (MCLR/RA5), 10 (LVP/RB4), 12 (RB6), and 13 (RB7) are reserved for in-circuit programming via Wisp628. Pin 11 (RB5) is used for the double-click detector. The following pins are used for LED outputs:
                  +------------+
            RA2   | 1       18 |   RA1
            RA3   | 2       17 |   RA0
                  | 3       16 |   RA7
                  | 4       15 |   RA6
                  | 5       14 |
                  | 6       13 |
                  | 7       12 |
            RB2   | 8       11 |
            RB3   | 9       10 |
                  +------------+
Double-Click: The combination of the capacitor buffers and the max 2mA current draw ![]() of the 16F628 doubles as a classic R/C timer, allowing the PIC to run for 1 second after power has been removed. In the meantime, pin RB5 will detect exactly when power is removed. If the user turns the dome-light switch off and then back on within 1 second, then RB5 will drop low, then high again over the course of that second, while the PIC remains constantly powered and executing. Thus, a quick double-click can be detected, and the PIC will cause the LED to brighten one step (until it's at its brightest, when it will loop back to being its darkest). With switch debouncing, the states are:
of the 16F628 doubles as a classic R/C timer, allowing the PIC to run for 1 second after power has been removed. In the meantime, pin RB5 will detect exactly when power is removed. If the user turns the dome-light switch off and then back on within 1 second, then RB5 will drop low, then high again over the course of that second, while the PIC remains constantly powered and executing. Thus, a quick double-click can be detected, and the PIC will cause the LED to brighten one step (until it's at its brightest, when it will loop back to being its darkest). With switch debouncing, the states are:
According to the R/C Time Constant rule, time (seconds) = resistance (ohms) * capacitance (farad). T = R * C. Substituting V=IR in since we have a certain current draw and not a fixed resistance, we get T = V/I * C. Fortunately, google makes this terribly easy for us.
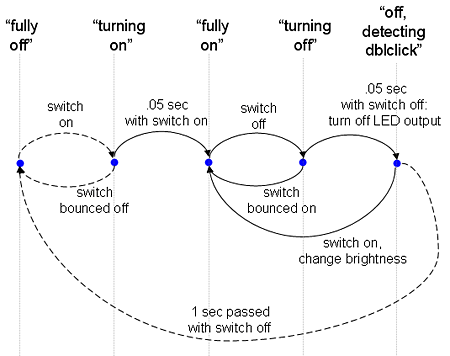 (dotted lines indicate when the PIC is/becomes powered off and unable to compute (eg. VSS drops below 3.0 volts). Yet "switch on" and such refer to the direct switch status coming in through RB5, not the time-delayed VSS input)
Output: Each LED should be flashed at least 40 times a second.
A MOSFET is used to drive the LEDs because it provides both voltage and current gain and thus is frequently used for microcontroller driving of power loads.


Todo before ordering:
 (2pin male & female, 3pin male & female)
Todo after receiving order: