Polycaprolactone (PCL) is a hand-moldable plastic that softens when placed in hot water. It's sold under brand names such as Polymorph, Friendly Plastic, PlastiMake, InstaMorph, Thermoworx, and ShapeLock.
Add the section about using PCL plastic as a "removable fastener" and even a "tamper-proof fastener".
? Consider adding tooltips to many links, to summarize their target, to better help the reader decide whether to click on them.
Heating methods
Hot water — This method is more foolproof than the others. It's great for heating thicker pieces of plastic, because it allows long soaks at a nearly constant temperature.[1]
While boiling water works fine, manufacturers recommend a water temperature closer to 60°C (140°F). The downsides of extra heat include increased stickiness, and portions of the piece drooping before you can cool it. A body wax warmer, portable cooktop, electric kettle, sous vide machine, or rice cooker can provide finer control over water temperature. A rice cooker's "keep warm" mode is especially useful here — they're typically set to 60 - 65°C (140 - 150°F), because that's just above the food danger zone.
Oven — Not all ovens have a minimum temp of 60° to 100°C (140° to 212°F), but some do. Heating will take longer than submerging the plastic in water, however, due to air's lower thermal conductivity.
Microwave — Provides fairly even heating that's only a few millimeters deep. This and all following heating methods can easily scorch the plastic, so be careful. Heat 10 to 20 seconds at a time. Pro-tip: place objects away from the very center of the turn plate, otherwise portions are likely to be consistently exposed to hot spots or cold spots.[2]
Hair dryer or heat gun — Provides localized heating of the surface. These are helpful for preparing two surfaces to be joined together (TODO — produce a quick video of me going through this process; I think it's pretty important that the reader understand this point), or for a final pass that improves a part's surface or appearance. Small heat guns, like the kind used for heat embossing, are perfectly adequate.
Heat a metal tool and hold it against the plastic — Provides very focused heating. Good options include the back of a spoon, a kitchen knife, diagonal cutters, or an awl. Tools containing more metal will retain their heat longer.
An open flame — There are two reasons to avoid this: Some fuels (like disposable lighters) burn dirty, and will leave noticeable soot marks behind. But even for clean-burning fuels, a flame is the hottest of all heating methods, up to 3000°C (5500°F), and so is the most likely to scorch the plastic. It produces extremely superficial heating, which might be desirable in a few situations.
Cutting tools
To cut a straight line in thin sheets, tin snips or scissors work well. Micro-serrations really help.
A straight-edge and utility knife can make fairly precise cuts. Remember that more shallow cuts are better than fewer deeper cuts.
To pull off small chunks of plastic, use end-cutting pliers (AKA nail pullers), the wider the mouth the better. This model has worked for me, it has a 1.4" (37 mm) mouth.
Drills and saws work. Cutting operations inevitably produce heat, but this must be minimized, otherwise the plastic will soften and cutting will become increasingly difficult. Reduce cutting speeds as much as possible, and cool both the workpiece and the cutting tool beforehand. You could even submerge the workpiece in ice water and peck drill. (If you're extremely ambitious, a dry ice and ethanol bath is even better. Avoid going cooler than -60 °C, because that's PCL's glass transition temperature.)
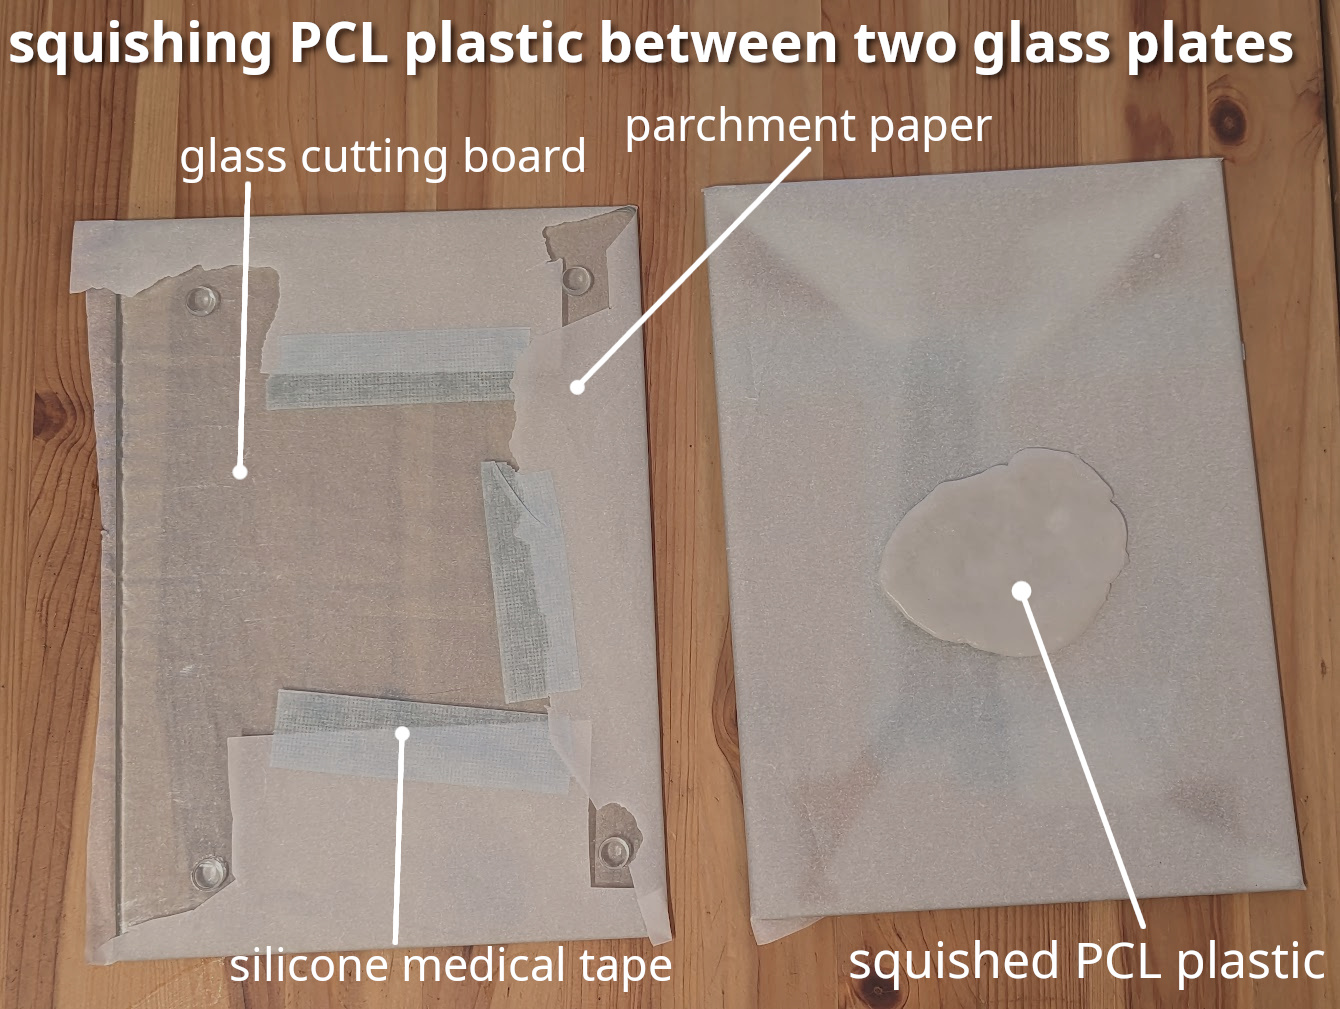
PCL plastic will stick to nearly everything when it's warm — except for parchment paper. The importance of using parchment paper when shaping PCL plastic can not be overstated. It's especially useful for pushing the plastic against a flat surface to flatten that side of the plastic, but parchment paper can be wrapped around other shapes too.
Note that the vast majority of tape refuses to adhere to parchment paper. One of the few that does stick is 3M Nexcare "pain-free removal" medical tape, it should be available at your local pharmacy. I believe it's similar to other silicone medical tape.
Materials that adhere only when warm
These materials no longer stick very well once the plastic has cooled:
(TODO — try wax paper)
silicone
metals (the surface should be bare and clean; "non-stick" coatings tend to actually stick better to PCL than bare metal)
glass
cling wrap
low surface-energy plastics don't stick to very many things — polypropylene†, polyethylene†, polystyrene/Styrofoam†, PVC†, PTFE/Teflon†, Plexiglass†,
ceramics †
(TODO)
Making a strong mechanical connection
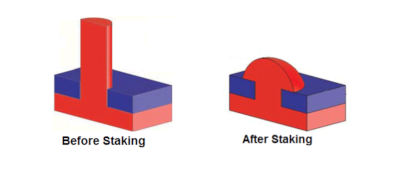
If you want PCL to adhere strongly to a dissimilar material, consider using plastic staking. [2]
TODO — Try making my own version of clay sculpting tools by cutting apart silicone kitchen tools into the right shapes. Test this out, hopefully the silicone won't stick to the PCL at all.
TODO — Similar to the above, note that there are some silicone tools pre-made that may be the right size and shape; [1][2][3][4][4b][5](more)
Creating sheets
The quickest way to make sheets, if having a precise thickness doesn't matter as much, is to squish PCL between two plates of glass with your hands. Buy two glass cutting boards, wrap the front side of each board with parchment paper, and secure the parchment on the back side with silicone medical tape. Without the parchment paper, the plastic can be really sticky when it contacts the glass surface.
(Pro-tip: just before putting away your PCL at the end of a session, it's good to squish all unused thick pieces into thin pancakes. This allows the eventual re-heating to go much quicker. All plastics have low thermal conductivity, so it takes a long time to bring thick pieces up to temperature. It's like how cooking a large turkey takes multiple hours.)
Turning random pancake-shaped sheets into rectangular sheets can be done by making cuts with a straightedge and utility blade.
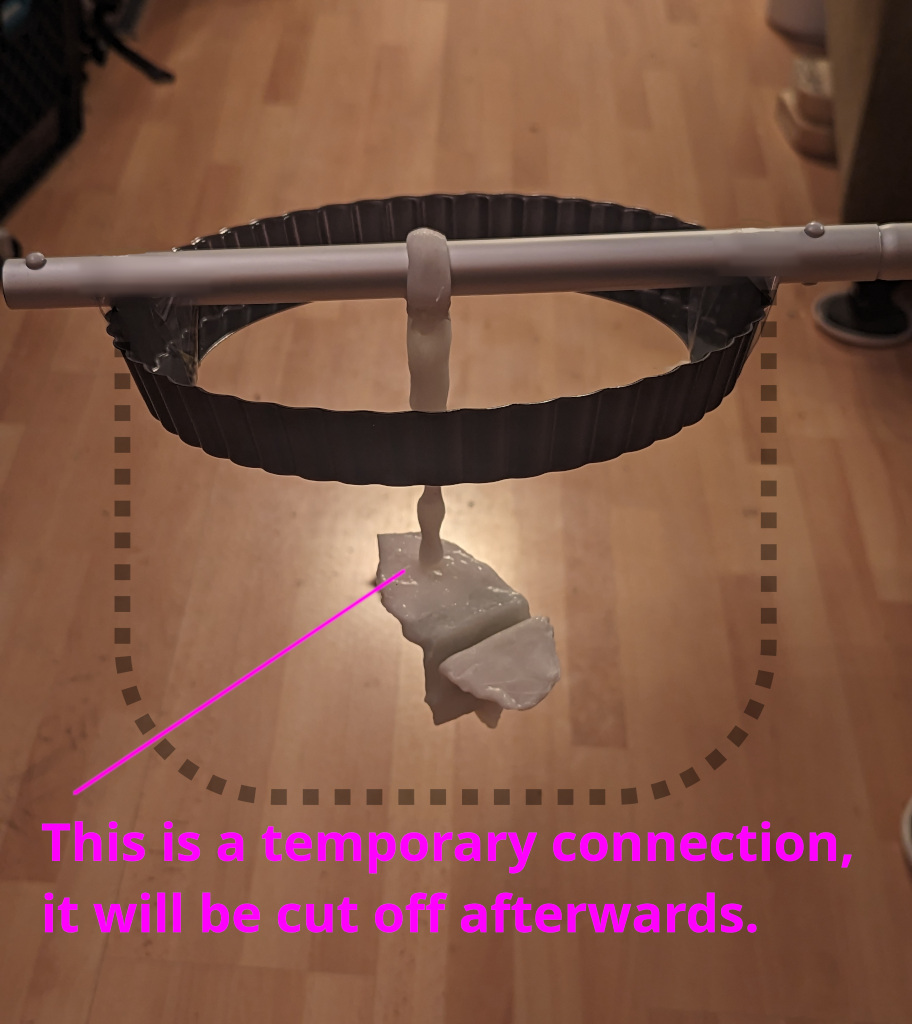
Dowel rods can be made like this: Make a rectangular sheet. Now slice off strips that are as wide as they are deep, resulting in strips with a square profile. The square profile can be made round by heating the surface, and pressing down the square corners until they're roughly round-shaped. This can be done quickly by rolling the strips between two flat surfaces. If you don't need a precisely round rod, the easiest thing is to roll it between your hands. This works up to ~1 cm dowels. TODO — figure out how to make thicker dowels.
It is very useful to provide localized heating to a specific area of your part, so that you can make revisions to that area only, leaving the rest of the piece unmodified. This allows you to iteratively refine the shape over several steps. This is what makes polycaprolactone so powerful, the ability to make targeted revisions.
Having a tub of cold water available speeds up the hot ⇒ cold ⇒ hot cycles enormously.
When you're working on refining thicker structures, those can be pretty tricky to make small revisions to. Here are some approaches you might think of trying:
Hand-hold half of the piece above water. Unfortunately, thicker structures require multiple minutes to soften completely through, and my arm starts to hurt when holding it out for way less than that.
Jury-rig a mechanism to hang half the piece above the water. This does work, but it might be time-consuming to rig up each time.
I recommend planning to create the structure in several pieces. Each piece should be limited to a size that it can be thoroughly reheated easily. Then use a heat gun to combine the pieces together.
Mold-making / casting
(TODO — maybe recreate part of this image for use in this section?)
mold-release agents — a thin layer of vaseline, cling wrap, cooking spray, or vegetable oil
When using PCL plastic for both the mold as well as the object being cast, keep the temperature of each side as low as possible to minimize unwanted adhesion: 1) put the mold in the freezer for an hour, and 2) for heating the work piece, use water that's close to PCL's melting point of 60°C (140°F).
If you don't have a hotplate, electric kettle, rice cooker, or low-temp capable oven, you can still get precise temp control with a hand-held thermometer — boil water, then add enough cool water to drop it to the desired temp.
You may have to work fast once you press warm plastic against the mold, because the mold surface will begin heating up. You could get longer working times by using a dry ice bath — submerge the mold in 90% isopropyl alcohol or denatured alcohol, then toss in enough dry ice to reach the desired temp.[3]† Avoid going below -60°C (-75°F) or the plastic will become extremely brittle.
Because PCL is inflexible, even tiny protrusions are a problem, so you may want to consider two-part or multi-part molds. Mold partings must include keys to ensure alignment. Two-part and multi-part molds are more time-intensive and require more skill.
Mold materials are almost always flexible, to make demolding parts with minor protrusions possible. Here are some flexible mold materials that can be used in combination with PCL plastic:
silicone — Personally, I find the high cost of consumables and the endless specialist knowledge to be daunting. And if you want a high-quality surface finish, there are high up-front costs as well. On the other hand, silicone/latex mold-making is a very useful and powerful skill to learn.
TPU (thermoplastic polyurethane) — If you have a compatible 3D printer, you can directly create molds, without going through an extra step of 3D printing a positive form⇒ creating a negative mold from it ⇒ casting the final PCL object. Note that TPU is a broad category of plastics — some types of TPU may stick to PCL, other types might not. I don't have a 3D printer, so it's left to the reader to figure out which TPU filaments might be useful here.
† I haven't yet been able to verify this information either via personal experience or via multiple reliable sources. Take with a big grain of salt. TODO — Verify these.
